Showing posts with label DIY Crafts. Show all posts

Monday, May 12, 2014

DIY Monogrammed Spring Wreath


Let me first start by saying...I have discovered a new love: the love of making wreaths! The first wreath I did was this past year for Christmas and now I have two under my belt. {See that first one here.} This wreath is one I've wanted to make for quite some time, but didn't get around to until mid-April. I love the final wreath though and am glad I got it made!


Gather your supplies!

You Will Need
a wreath
hot glue gun
fake flowers
cardboard
twine
a sharpie and scissors


Lets start with the monogram!

1. Before you work on cutting out the monogram, plug in your hot glue gun and make sure it's got glue in it ready to go. It might also be a good idea to put something under the glue gun, as it will drip as the glue melts and gets ready to use (for those of you who haven't used a glue gun yet).


2. Using the sharpie, draw out the letter you wish to display on the cardboard. As you can see, I did mine free-hand so it wasn't perfect on paper, but that doesn't effect the finished letter.


3. Use the scissors to cut out your letter. This part can be tricky. Big scissors work best here I think. Also, shape up your letter anywhere you need to once you've got it cut out. The sharpie letter is just to assist you in cutting it out.


4. Flip the letter over and give it a few quick swipes with the hot glue gun. Start the twine wrapping on the back of the letter. Make sure to put the twine just over the edge so it will cover the end.


5. Using the glue gun, work small spaces at a time. First run some hot glue (only needed on the top side of the letter) and then wrap the twine around the cardboard and secure in the hot glue. Careful as the glue can burn fingertips before it's completely dried! Continue gluing & wrapping until the letter is finished.


6. Here is my finished 'S' monogram letter. I was quite pleased with how well this part of the project turned out!

Flower time!


7. In the 'gathering supplies' photo you saw two different flowers. When I started making this wreath I wasn't sure which flowers I was going to use, obviously I went with the pink peony's. Take apart each flower. The stem should pull right out of the base of the flower so no wire cutters needed here!


8. Now attach the 'leaves' to the base of each flower with a little hot glue. Arrange the flowers on your wreath and then glue in place. Arrange first though in case you end up not liking the way it looks the first time (I did mine 3 times before I ended up with the placement I have in the final photos). Glue the flowers down, glue the monogram down (that will take TONS of glue by the way).


9. Display your new wreath on a pretty hook for all the world (or just your neighbors) to see!

More photos of the wreath!


I think the twine blends in a little too much with the wreath, but I'm still happy with how it turned out.

Saturday, April 19, 2014

DIY No-Pin Skirt Hem


I recently made a LOT of new jean skirts. Most of them have been for myself, but I made some for my little sister, and some for a few other people. One day I was really getting frustrated with pinning the hem of a skirt so I decided to try something new. And it worked so well that I made the rest of the skirt hems the same way!

Step 1: Make your skirt! If you're doing a denim skirt from jeans, go ahead and do all the steps up to making the hem line. If you need a tutorial I have several to choose from:


Step 2: Once your skirt is made up to the point of being hemmed, go ahead and check the bottom to see that the inserted pieces are fairly even with the leg part of the pants. I know the bottom of the skirt in this photo doesn't really look even, but it is.


Step 3: Take the skirt to the sewing machine. Start on either one of the side seams and fold it over just as wide as the presser foot of your sewing machine. **Hint: You don't start in the front or back because it will be more obvious when you're finished.


This is the edge of the skirt where you should start sewing. I used a pin to hold flat the flaps so you could see what it should look like before you sew. I only used the pin so I could take the photo.


Step 4: Sew around the bottom of the skirt, keeping the fabric folded so that it is just as wide as the presser foot all the way around the bottom. Once this is done continue on.


Step 5: Now, fold the hem part that you just worked so that the folded edge is even with the left side of the presser foot and the bottom edge is even with the 3 mark on your sewing machine. Start on one of the side seams (see hit in step 3) and work all the way around, keeping the fabric even as you go.

The underside of the skirt will have two lines of stitching, but the top or outside of it will only have one.

Step 6: Remove any excess threads, and you're done!

Here are some photos of the finished skirt hem:


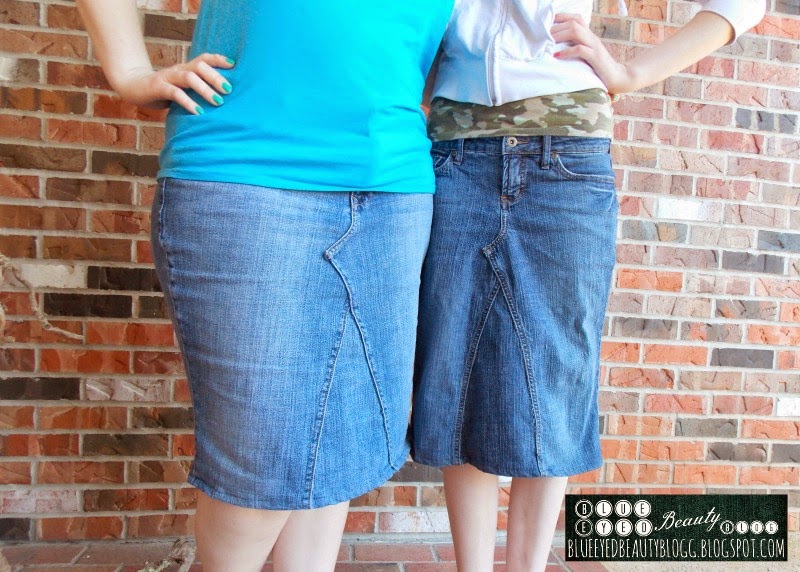
And here is a photo of my sister and I rocking some of our other skirts where I used this same no-pin skirt hem:


This Post Was Shared!

Friday, March 28, 2014

Guest Post | DIY Valentine's Garland

One of my very best friends has finally written a guest post for me! I have bugged her about this for months and she finally took a moment from her extremely busy life to put one together and it's wonderful! She is such a creative person and comes up with some really cute ideas. This post was originally supposed to be for Valentine's Day, but seeing as I have not been online hardly at all since having Little Man I missed the opportunity to schedule it before then. It was too cute to pass up though, so I'm sharing it with you now!
DIY Valentine's Garland

Hello everyone! I'm Kora from over at Eclectic Darling! Helen is one of my very best friends and I'm so thrilled to be able to do a guest post on her blog! Today, I'll be showing you how to do a super cute and easy Valentine's garland that is made with tassels and crochet hearts. This is my first ever DIY post so I'm excited to see how it turns out!
What you'll need:
-Yarn of choice (Pink or red work great with Valentine's Day.)
-Crochet hook
-Scissors
-Yarn needle
-Material (I used a floral I found around the house.)
-String (Or you can use the yarn. This is to tie the tassels with.)
-Ribbon or Lace of choice (I found my lace in a little container at Walmart for a buck!)
If you do not know how to make a crochet heart, no worries! I didn't either until I watched the youtube video below. I watched it a few times to make sure I had it right. Once you get it down, it is so very easy!

Simple right? I have been on a "heart making" kick since. I made an abundance of them, but for this project I only used 8 pink hearts. Once those are made, you can move on to the next step!

Cut the fabric into strips. Fold the strips in half to decide how long you want your tassel to be and cut them to that length. I used about 5 strips of the fabric per tassel but you can use however many you want depending on how full you want the finished product to be.
Tie the strips together in the middle with your string (or yarn) and fold in half. Then tie another piece of string around all the fabric an inch or so down from the top. Now that you've tied it all together you're ready to snip the fabric into smaller strips to create the fringe. Just cut them to whatever width you desire. It does not have to be perfect! That's the beauty of this project. Once all your tassels are done, you're ready to move on! I used 5 for this project.
Tie string through the middle of each heart so they look like ornaments. This will make putting them on the garland so much easier. Since that's done, you are ready to start assembling! Hurray! Thread your lace or ribbon through the yarn needle and start putting them on. I did a tassel first, then two hearts, and repeated till everything was on.
And now, your finished Valentine's garland!


Isn't it cute?! The great thing about this garland making thing is that you can do whatever pattern you want! You could do all hearts or even add little (non-dangerous) arrows. All the sticks outside were wet from snow so as soon as it dries, that is my next garland. I thought this project was so fun and can be used for other things than just Valentine's Day. In the house, at a wedding, a little girl's birthday party... the possibilities are endless! This one is going up in my room for year round. Hope you all enjoy this little DIY. I have certainly loved sharing it with you!
Connect with Kora

Friday, October 11, 2013

DIY "I'm Thankful" Jar


Last Fall I put together a Fall Bucket List and item #22 was "Start an 'I'm Thankful' Jar to read on Thanksgiving Day." I was guest posting on Blissful & Domestic Blog in November and ended up sharing today's tutorial over there, but this is a new year so I thought I'd share it hear this time because the idea was so well liked at our house. As I did with many of the completed items from my Fall Bucket List I wrote a post about The Thankful Jar and shared some of the things people wrote that they were thankful for.

What You Need
A quart-size mason jar
Fun piece of paper for front of jar
5-8 pieces of copy paper for the 'thankful' notes
A sharpie or other marker
Masking tape
Scissors or paper cutter
A pen for people to write the notes with

Directions
1. Make sure the jar is clean! Mine was washed a few days before I started the project so it was ready to use.


2. Cut out your fun piece of paper for the front of the jar. I did a 3 inch by 2 1/2 inch wide piece for my jar. Write the words "I'm Thankful' on the front of the paper. I used a fun paper punch to add some 'spice' to the corners. This project is totally customize-able so have fun with it! Use masking tape to secure the paper onto one side of the jar.


3. Next cut the copy paper into square like shapes for people/your children/family to write what they are most thankful for. I did squares that were 3 inches by 3 inches or close to that. Mine are nowhere near perfect since I just eyeballed it with the paper cutter. After all, you're only writing on the paper, reading it in a few weeks and later throwing them away so it wont matter if it's a perfect square or not.


4. If you want you could write "I'm thankful for..." as a prompt on the pieces of paper. I did this for one and left the rest blank and it worked fine just like that.

5. Set your decorated jar, the pieces of paper, and a pen in an easy to get to place. Explain to everyone the purpose of the jar (to share things you are currently thankful for) and make sure everyone gets a turn to put at least one thing they're thankful for in the jar by the time Thanksgiving comes around! You can have them write their names too or you can all try to guess who wrote what things when you read them on Thanksgiving day.
  
To see some examples of things our family wrote on papers for our Thankful Jar last year check out this post.

Friday, June 21, 2013

Homemaking 101 | Add A Little Paint


It is amazing how much a little paint can change the appearance of some things! Today I'm going to share with you a project I did awhile back to help spruce up and organize my bathroom. The basket was one that's been around for awhile and I thought it was time for an update. I never used it with the flowers on it before, but since I've painted it the basket has been quite popular.


We only have one bathroom in our apartment. There was a little space right across from where the toilet sits for me to store the old secretary bookshelf that was given to me. At first I wasn't really sure what I was going to put on it, but as you can see it's come together quite nicely.


Now this is the basket that had a little paint added to it. I forgot to take a complete before photo when I started painting the wood piece on the front, but you can still see pretty much what it looked like before I added the paint.


Here is the basket after I painted it. I am using this red color in several rooms throughout the apartment and LOVE it. The painted handwriting isn't my favorite, but it's the best I could do with the brushes I had on hand. I now use this basket to store lotions in and it keeps them nicely organized and in one place.


Here's a close up of the top two shelves. As you can see I like baskets! The one on the bottom (technically the middle shelf) is used to store small hand towels and wash cloths. It does a nice job of keeping them orderly too.


These are the roses from my wedding. I strung them up to dry out and haven't taken them down since because I liked how they look with the rest of the bookshelf. I'm sure they won't stay there forever, but it works for now and I like smelling them when I walk by.

What projects have you 'added a little paint' to?

Want to read more on Apartment Living? Click here!

This post was Shared!

Tuesday, June 18, 2013

DIY Tank With Lace Insert


I don't know about you, but for me sometimes shopping can be really frustrating. Especially when you're trying to dress modestly and it seems no one else is thinking "cover up". Especially when it comes to tank tops. If you're crafty then you might really be grateful for this tutorial...if you're not crafty I am considering selling these on my online shop so email me and we'll talk about it. Okay, back to the tutorial!

What You Will Need
A tank top. (New. Old. Doesn't matter!)
Lace*
An old white sheet (or same color as lace)+

Notes
*I find good size amounts of WIDE lace at antique stores. I know that seems odd, but it's there! I find it all the time and I always pick it up because it's so hard to find lace without spending a fortune on it! Most of the lace I find I get for less that $2 per roll. Totally worth looking into...especially if you plan to make several of these tanks.
+I usually pick up sheets for 0.25cents at yard sales/garage sales since you can usually find them in still decent shape.

Directions


1. Lay the lace over the top part of the tank. Cut it with plenty of space on each edge as shown in the photo above.


2. Take the piece of lace you just cut and lay it over a corner of the sheet. You'll want to make sure you have the sheet smoothed out so there are no major wrinkles since this will be showing on the finished product. Pin the lace piece to the sheet with plenty of pins! Cut the sheet so there's just a bit of space around each edge of lace.


3. Time to sew! I've found that it's easiest to just do a straight line instead of trying to follow the fancy edges of the lace. It still looks nice and you really can't tell much of a difference. I've done them both ways, but I recommend the straight line which is my personal favorite way to sew the lace to the sheet.


4. Time to trim! Now this is where I usually follow the edge of the lace so that you can see the pretty edging even though I don't usually sew along that line. View the photo above for how I trim my sheet edges to match the lace edge.

That black silky fur in the corner is my cat Emerald. She likes to watch me sew.

5. Take the tank and put it right side out (if it isn't already). Put the lace insert piece in the front of the tank as shown. Make sure the lace is facing up and the sheet is facing the back of the tank. You should have enough to pin it to both sides of the tank edge. You'll want to pin it to both sides even though you'll only be sewing it to the closer side. Pin the full scoop to the lace.

The inside of the shirt after the lace insert has been sewn in place.

6. Now you will want to sew the tank to the lace. I always do this with the front of the tank facing out so I will know exactly how the finished product will look when I'm done. Sew following the lines that are already on the tank (there's usually 2 or three lines where the original seam was sewn). Sorry I don't have a pic of the actually sewing process for this step!

Emerald's paw again.

7. The final step in this project is trimming off the excess fabric once you've sewing the lace insert into place. (See photo for step 6 to see what the inside of the shirt looks like after sewing). One you've trimmed off the excess fabric you're good to go!


There you have it! A new way to make a modest tank for wearing under your favorite low-neck shirts and only spending about $5 for the whole thing!

Saturday, December 29, 2012

Brown Paper Packages Tied Up With...Ribbon


Can you tell that I watched The Sound of Music as a child? :) Well, I just happen to love that movie and I was writing the tile for this post and thought of it...anyway... This Christmas not only did I give goodies to Autry's family back in Mississippi, but I made up packages for all my siblings, parents and grandparents too! (Winter Bucket List #8: Make cookies & treats to send to family.)

Before I share with you all the goodies stuffed inside these 'brown paper packages tied up with string' I wan't to show you how they're wrapped up.

What I Used
white paper doilys
thin green ribbon
brown paper packages
red sharpie marker
hole punch

Directions
 
1. Stuff the bag with all the goodies.
 
2. Fold the edge of the brown bag over. Fold a little part of the doily. Write who the gift is to on the front of the doily and then set it on top of the folded bag.
 
3. Use the hole punch and put two holes in the top of the bag to feed the ribbon through.
 
 
4. Make sure to cut a good length of ribbon. Feed it through each hole. Make sure it is smooth on the back as you can see in the photo.
 
 
5. On the front of the package tie the ribbon to hold it in place. Next tie a bow with the ends of the ribbon tucked behind the knot so they both hang down straight (or do a different type of bow...this is all I really know how to do).

The Goodies Inside
Click on each photo to view the recipes!
I will tell you that everything was quite popular!!