


I've made a
LOT of skirts in the past few years, but lately it seems like when I go to make
a skirt something goes wrong. This skirt was one of the ‘problem skirts’ I’ve
had recently. Fortunately I was able to get it in working order and once it was
finished I wore it all the time. This maternity skirt was a life saver and
really gave me a lot more outfit options throughout pregnancy. PLUS it was
super comfortable!
Here are some other denim skirt tutorial options for you if you're not prego, but are wanting to make a denim skirt: DIY Knee-Length Denim Skirt w/Ruffle, Long Denim Skirt, Long Denim Skirt w/Ruffled Middle Piece.
A Note About
Picking Out Maternity Pants
I found my jeans
for this skirt project at a local Goodwill. They were about $4 and totally
worth the buy! Since being pregnant I wear anywhere from 13-16 in non-maternity
clothes so I could never tell just from reading the size label if the jeans
would fit.
When you’re
shopping for maternity pants (especially at second hand stores) ALWAYS try on
the jeans before you get them. Maternity jeans fit different than regular
jeans. I also suggest trying them on before you get them since not all
maternity jeans have the same type of stretchy band to hold them up/fit
comfortably over your belly. I prefer ones that go over the top of my baby bump vs. ones that run under it.
You just have to figure out what is most comfortable for you.
A Note
About The Tutorial
There are
plenty of other ways to put together a denim skirt. This tutorial shows a way I
started using recently and really like because it’s quite a bit easier than
ripping out all the seams to make a skirt. If you’d rather a seam-ripped
tutorial check out my Knee-Length Denim Skirt w/Ruffle Tutorial.
 |
| {click here to see the full outfit in this photo} |
Let’s Begin!
 |
| The jeans I used for this project. |
ONE. Pick
out your maternity pants! Make sure the band on the pants is comfortable so you
don’t waste your time with an uncomfortable skirt.
 |
| Cutting along the seam. |
TWO. Cut
open your jeans. You’ll want to cut the inside part of the jeans as close to
the original seam as possible. Make sure to cut under the ‘top flap’ where the
original stitching is located if you can so that there won’t be fraying of raw
edge of the denim which is on the underside of the original seam.

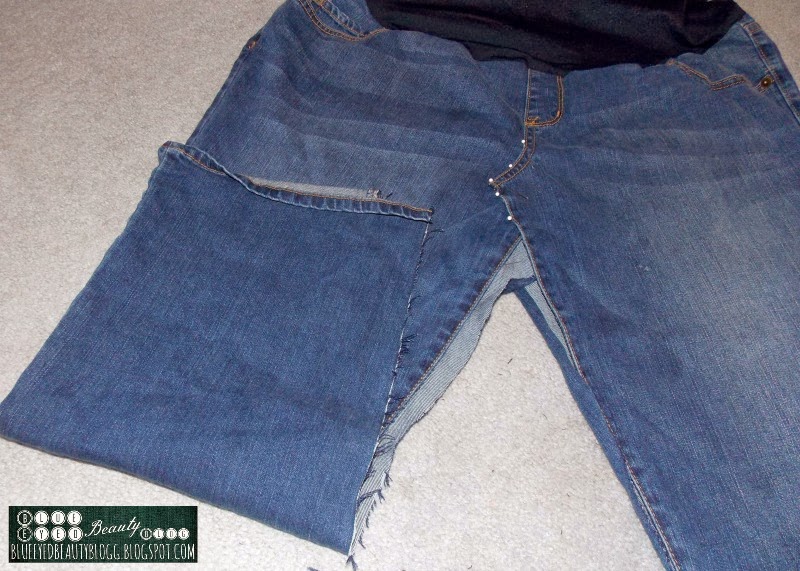
THREE. On
the front of the jeans were the zipper would be you’ll need to make a cut along
the seam. You won’t go all the way up to the bottom of the ‘zipper’ part. Make
sure you’re jeans are laying completely flat and the two sides are out where
they’ll be in the end. Where the fabric stops bunching (in the middle where the
zipper part is) is where you stop cutting.

FOUR. Pin
the flap down where you just made the cut under the zipper section. You’ll want
to make sure to get the piece of fabric that's on the underside of the overlap
so there won't be a hole in the front of your finished skirt.
 |
| Finding where to make the cut at for the length of the skirt. |
FIVE.
Continuing work on the front of the skirt: Make sure the legs are lined up
evenly. Fold the bottom of the pant leg up to where you finished pinning in
step four. Mark where the bend in the pant leg is. Make sure the pant leg is
even and then cut straight across.

SIX. Fold
the jeans/skirt in half so the cut leg is on top of the uncut leg. Make sure
everything is lined up evenly and cut the second pant leg off.

SEVEN. Now
that your skirt is cut to length open it back up so the front is facing up for
you to work with. Take one of the pant legs you just cut off and lay it under
the front part of the skirt. Pin it in place along the bottom and then make
sure it’s smooth all the way up to the middle overlap area. You can go ahead
and trim off any excess fabric at the bottom of the skirt if you want, or you
can do that later.

EIGHT. Pin
along the edges of the middle insert for the front of the skirt. Make sure that
the insert piece stays smooth as you work with it.
NINE. Now
that the front is completely pieced and pinned take it to the sewing machine.
Start sewing on the part that overlaps on top (so the piece that flows from the
zipper area). Do the first line of stitching following the original stitching
and then go to the other piece and do the first line of stitching there. Once
all the pins are removed go back and add the second row of stitching to both
sides. I usually put the edge of the presser foot on the edge of the fabric and
then push the needle to the left or right depending on what side I’m sewing (so
if you’re sewing the side coming out of the zipper area you’ll want to have
your presser foot lined up with the edge of the jeans –to the left- and then have
the needle all the way to the right. Do the opposite for the other part of the
jeans.). On the inside if the skirt you’ll need to cut out the excess fabric
once the stitching is completed.

TEN.
Unfortunately I forgot that you’ll need to do a little seam ripping, but not a
lot! Rip the seam in the butt of the jeans all the way up to the top. Turn the
jeans inside out. You will want to line up the seams so that the one that typically
runs down the middle of the butt is closest to you. Cut the jeans into a slight
curve for the butt and then straighten back out when you get closer to the end.
Pin the fabric in place.
**If you
have a bigger bum, you’ll want to leave enough space for it. However don’t cut
an obvious curve since it will gap funny and then you’ll have to go back a few
times until you get it to be smooth.**
 |
| The stitching on the inside of the skirt. |
ELEVEN.
Working with the area you just pinned, sew a straight line and then go back
over the extra with a close zigzag stitch (or use a surger if you have one).
Trim off any excess fabric that is leftover once you finish stitching it
together.

TWELVE. Take
a piece of leftover denim from one of the legs and fill in the gap in the back
of your skirt. It shouldn't be a big gap to work with. Fold under the raw edge
of the skirt and pin the fabric in place. Sew the piece in place with a
straight stitch. On the inside of the skirt remove the excess fabric.
THIRTEEN.
Try on your skirt and make sure everything looks right.
FOURTEEN.
Hemming time! This part is personally my least favorite. If you sew often and
have a preferred method go ahead and use it. If not, just fold under the raw
edge, stitch in place, fold again and stitch one last time so there is no raw
edge showing. You don’t have to have a big hem; something small and simple will
work perfectly.
Your skirt
should be done now! If you have questions about the tutorial feel free to ask
away in the comments and I’ll do my best to answer. I always try to write
detailed tutorials so they’re easy to follow. Good luck on your sewing
adventure!
I thought I'd share a few links of the different outfits I used this skirt for with you. Other than the outfits linked below, I also found this skirt super comfy with just a regular loose t-shirt! These are all Prego With Style outfit posts, of course! :)
No comments:
Post a Comment
Thanks for stopping and leaving a comment! I LOVE reading comments! {They also help me know what you are interested in reading on my blog!}
Comments on posts older than 14 days are moderated. Other comments may be removed if they are inappropriate or spam. I do read all comments but can't always respond to each one because I don't get online very often.
My email can be found on my 'about me' page if you would like to contact me or you have a question.