Thursday, February 28, 2013

Guest Post | Susana @ Susana The Deaf Lady


It was really nice to meet Helen here, she seems nice and I'm excited about doing a guest post on her blog. I've always wanted to do a health & fitness blog, but never have time, so I'm grateful I can do a post here on that topic.

My name is Susana and I blog over at Susana The Deaf Lady. I was born deaf in both my ears. If I'm not wearing my hearing aids I can't hear anything, so I wear them to hear what is going on around me. I was born in Queens, N.Y.C. and then I lived in a colony house in New Brunswick, N.J. until I was five. After that we moved to Kingston, N.J. and that's where I grew up.

My Tennis Story
 
Tennis is one of my favorite sports. When I was in high school, I used to play on the tennis team. I also went to Tennis Sleep Away Camp in the summer time, but never really enjoyed it. Last summer I decided to join a tennis group and give it another try. There were a few Chinese girls that played really well and I thought that I could never play with them because they were so good.

The group would play tennis about three hours a week, or more. It was so hot outside. After lessons and everyone was supposed to go home I noticed that the Chinese girls would keep on playing. I thought they were out of their mind. I never understood where the Chinese girls got their energy to play for hours after we were done with our lesson. It seemed like they were addicted to tennis! Not only was I exhausted from playing for two hours straight, but I was thirsty as well from being in the hot sun. After the lesson I would jump in the pool which was next to the courts.

Drinking lots of water and eating lots of fruits and vegetables really helped me get fit. Playing tennis regularly helped keep me fit and in shape. Some people played tennis so much better than I did, especially the tennis instructor, but practice helped me become a better player. It was embarrassing when I missed a few balls and everyone was watching me miss. I felt awful. The day came when the instructor was showing off and he missed the last ball. He was ready to hit it hard and far, but he swung his racket and he turned around in a circle and missed the ball. I felt better knowing that I wasn't the only one who missed a ball every now and then!

After two months, I was actually becoming a good tennis player. I was now playing with the Chinese girls who I thought were so far above my experience in the beginning. In the end I liked playing tennis so much that I would stay after the lessons for two-three hours more to keep playing tennis with the Chinese tennis addicts. I guess you could say that I'm kind of addicted to tennis too, but that is probably a good thing!

Monday, February 25, 2013

Guest Post | Lauren @ Simply Free: DIY Laundry Soap

 
Hi again! You might remember me from my guest post earlier this month of the DIY Fringe Scarf! If not my name is Lauren and I blog over at Simply Free about all sorts of random things regarding my faith, being frugal, living simply, creatively, and with style! Here I am at our wedding where I married my best friend & have been incredibly blessed to share in this journey with someone so awesome. :)
 
The husband and I are continually on a mission to simplify our lives. Most times this comes in attempting to be more frugal in our purchasing, shying away from processed foods, opting for locally grown items, and using reusable bottles, bags, etc. as much as possible. We plan on trying something new little by little to be as green as possible while also saving money. Our newest project was to make our own laundry detergent so I wanted to share about it as it was quite a success!

 
Materials Needed:
  • 1 cup washing soda (it was kind of hard to find in stock, but Walmart & Ace Hardware have it)
  • 1/2 cup borax (Target, Walmart, and pretty much everywhere we looked has this)
  • 1 bar soap (we just used what we had, which was Lever 2000)
  • Approximately 3 gallons water
  • A container of some sort to mix & store this in (we used a five gallon bucket with a lid) & then a more decorative glass beverage dispenser for everyday use
Directions:
 
First thing, put about four cups of water into a pan and put it on the stove on high until it’s at boiling, then lower the heat until it’s simmering. While it’s heating up, take a bar of soap and using a cheese grater, "cut" the entire bar until you have little soap curls. When you've lowered the temperature of the water to simmering, start tossing in the soap curls a bit at a time, stirring it until it’s all dissolved. You'll end up with a pale version of the color of soap (ours was white) and a bit of bubbles from the soapy mixture you just created.
 
Now add 3 gallons of warm tap water to your big bucket. Also add the washing soda, the borax, and the soapy mixture you just made. Mix together and then cover (we used aluminum foil first as our lid had holes in it) and place out of the way to set for 24 hours. The next day when you take off the lid, you’ll find a variety of things depending on the type of soap and the water you used. (Possibly firm or gelatinous, watery, or a mixture of both. Ours was the mixture.) Just stir it up a tad (it will then resemble other liquid detergents) and you're good to go. Use a measuring cup (we used the old one from our retail detergent which was 1/2 cup) and add 1 cup of detergent per average size load of laundry.
 
 
We tried it out on a load of whites first and the results were a success! The clothes were just as clean as with our previous commercial detergent (we've been using all free & clear recently) and smelled nice as well (better actually). And it was MUCH cheaper to make our own big batch that will last for a good while even after coupons and discounts. It was really a quick process and we know exactly what is in the finished product. I'm rather excited about this new adventure! The picture below shows the new homemade laundry detergent in its place in the laundry room for easy access.  The rest of the detergent is in the big bucket in a closet to refill later. 
 
finished product above the washer next to the basket
** note: this is for a traditional top loading washing machine. check out this site for a HE friendly version (dry detergent). **

Please let me know if you have any questions at all! I'd love it if you would stop by my blog and visit! I love hearing from readers! :)


A note from Helen: I use homemade laundry detergent as well! I've actually been making it for over a year and LOVE it! It's a whole lot less expensive to make your own & at smells great too! {see my recipe here for reference, it's basically the same as Lauren's!}

Sunday, February 24, 2013

Words On Sunday | Only 60 Minutes


{photo via Photokapi}

I'm not currently going through any dark hours right now...but maybe someone stopping by my blog this morning is. I hope you are encouraged by this statement!

Friday, February 22, 2013

Guest Post | Jenna @ Rain on a Tin Roof

 
Hi Y'all! I'm Jenna from Rain on a Tin Roof. I'm terrible at "About Me's". In fact, so terrible that I use pictures on my own About Me page on my blog. It's quite comical. In short, I'm a southern gal who loves some serious thrifting, crafting, re-purposing, and home diy-ing, which is what my blog is all about. While other 14 year olds wanted to read Seventeen, I was reading Christopher Lowell's Seven Layers of Design, and re-arranging my bedroom. What can I say, I'm a geek when it comes to decorating. I can handle a power saw with the best of 'em, but tend to make my Grunt Labor (hubby) use the power tools. {It makes him feel special to be needed. Total reverse psychology, y'all.} A comfortable, eye-pleasing room just warms my soul, and makes me proud its mine. I love turning something old and decrepit into something new and amazing. It's a thrill. I even started carting my daughter around to yard sales when she was a month old. It's important to train 'em early around here. If this hasn't bored you enough, you can read more here.
 
Today, I'm so happy to be doing this guest post for Helen while she is enjoying her wedding month!
Congratulations, darlin!
 
Now, on to the important topic here:
 
Thrifted Makeovers
 
I love me some thriftin'. I love Goodwill's, I love yard sales, I love diggin' through junk and having people gawk at me like I'm some sort of insane person. (Ok, maybe I am a little.) I also love a handful of Germ-X after each of these excursions. But, I digress. (Warning, this may happen more in this post. I am slight ADHD.) So, today I have gathered for your reading/reviewing pleasure, and hopefully to inspire you, some thrifted makeovers I've done.
 
Thrifting Rule #1 Never Leave A (Almost) Good Lamp Behind. If the shape is right, don't worry about the color, or even the wiring!! Re-wiring a lamp is super easy!
 
 
Exhibit A: I absolutely loved this petite marble (I think it's marble?) lamp below when I saw it at one of my local thrifted stores. The shape was beautiful, the marble was gorgeous, it was the perfect size for my kitchen counter. Problem: the wiring was bad. In fact, the wiring had been cut almost completely out and the socket was some sort of funky one. No worries! I snagged the lamp for a few bucks and headed to Lowe's to pick up a new wiring kit.
 
I re-wired it in less than an hour (those kits are super easy to work with), re-covered a shade (another thrift find), and got the end result:
 
 
Exhibit B: I found this brass lamp at Goodwill for $4 on a half-off day. I liked the shape, but I LOVED the marble base. Sorry, I taped it up before I took the 'before' picture!
 
 
The wiring on this one was fine! All I did was spray paint the brass with grey spray paint primer (I liked the gray primer color best), did a satin spray topcoat, and bought a new shade at Target.
 
 
And a close up of the marble:
 
 
Gorgeous!
 
Thrifting Rule #2 It may be Ugly and Smelly, but give it a shot anyway.
 
Exhibit A: I call this the Despicable Red Ottoman. I found this at a thrift store that was packed to the gills with junk and somewhat smelly. This ottoman was only $8 there. Luckily, the smell of the store hadn't rubbed off on it yet, but I gave it a good coat of Febreze and Lysol anyway.
 
 
The red was horrendous. Needless to say, I did not buy it for its color. Grunt Labor had wanted something to prop his feet on while watching Sportscenter, and I thought this would be perfect. I got out some extra canvas I had from re-covering dining room chairs, made a quick slipcover, and painted a blue stripe down the center.
 
 
Grunt Labor likes it. He's happy and I have a pretty ottoman for $8. Score!
 
 
Exhibit B: This circa 1970's plastic owl was found at that same smelly, packed thrift shop. The colors definitely left something to be desired. When I got home, I ran for my can of trusty white spray paint, gave it a good coat, and now it greets people upon their arrival into my crazy little world.
 
 
Thrifting Rule #3 Look to the Unexpected for Storage.
 
 
Exhibit A: Vintage Coke Crates don't just have to sit on tables. Turn them sideways, screw 'em to the wall, and store ties in them! Grunt Labor uses these for his ties and belts. Stylish, Functional, and Unexpected.
 
 
Exhibit B: I love metal. A lot. Especially metal baskets. I'm a sucker for 'em. I took these old gym locker baskets, turned them sideways, mounted them to the wall, and store my cookbooks in them.
 
If you'd like to check out more of my thrifted makeovers, head over to my blog: Rain on a Tin Roof. I'd love to have you follow along!
 
Now go get thriftin'.
 
~Jenna

Monday, February 18, 2013

Guest Post | April @ Sabbatical Soapbox

Make Your Own Potpourri!
 
Hello! I am April from sabbaticalsoapbox.com and I was given the wonderful opportunity to provide a post for you all! I am part owner of Sabbatical Soaps, a sulfate and chemical free soap company I started with my husband. My goal is to chronicle my research into practices both mainstream and holistic in my quest for health. My blog primarily focuses on holistic health issues as well as do-it-yourself natural bath and body products.

 
Spring will be upon us soon and I cannot wait to start growing a small herb garden that I can use for tinctures and salves! Also, with the ushering in of spring is the abundance of beautiful and fragrant flowers! This got me thinking about potpourri; with the addition of diffusers and wax warmers natural smells originating from organic materials has become kind of a lost art. I also know people who have difficulties tolerating the strong, artificial smell of these scents which makes potpourri a less offensive way to freshen up the home!
 
If you are a gardener, even of a small garden, you can make a wonderful potpourri mixture to provide a natural, clean scent to your home. Another nice part about making your own potpourri is that you can mix and match different colors and scents depending on the season, what you are growing and what kind of atmosphere you want to conjure within your home.
 
 
How to Use Potpourri--
 
The main use of potpourri is to put the mixture in decorative bowls that are placed around your home. You can easily find beautiful bowls at your local thrift, crafting or antique store. But most likely you already have some pretty bowls you've always wanted to put out anyway!
 
You can place potpourri in fabric bags (sachets) and put them in drawers and closets to scent clothing instead of spraying Febreeze which is full of chemicals. You can put them in storage boxes, chests, in your car, or hang them on doorknobs to create pleasant aromas.
 
You will want to squeeze them occasionally to release the scent. You can purchase muslin or cotton sachet bags online or at your local craft store. After spending the time making the potpourri mixture it will last a very long time and you can utilize all the gorgeous blooms and herbs you grow during the springtime!
 
 
How to Make a Potpourri Mixture--
 
1. You will need a large wooden, glass or ceramic bowl with a wide neck for mixing and stirring the dried ingredients with a spoon. Rub a few drops of clove essential oil into your hands.
 
2. Rub the bowl with the aromatic oil until it is smeared all around it. Other great essential oil choices would be geranium, rosemary, lavender, or orange. Bottom note oils work best because they provide the most lasting scent since this oil will be your base.
 
3. A typical potpourri mixture consists of roughly 4 parts rose petals, 1 part mixed scented flowers, 1 part aromatic leaves, 1/4 part calendula petals, and 1/2 part sweet herb.
 
4. Start mixing dried flowers, leaves including your sweet herbs which might be peppermint or marjoram. Make sure to store your ingredients in an airtight container before use.
 
 
5. Using a mortar and pestle grind up an assortment of spices such as: ground ginger, cinnamon, nutmeg, coriander, mace, allspice, or cloves.
 
6. Stir all your ingredients together to create an interesting blend of shapes, colors and scents.
 
7. Add a few drops of rosemary, basil, or lavender and give a good final stir, checking that the scent is spicy, flowery or fruity enough.
 
8. Spoon the finished potpourri into a jar with a tight stopper and leave for about six weeks to develop and mature. Stir every few days with a wooden spoon.
 
9. When ready to use, put your potpourri into a bowl or container with perforations that allow the aroma to escape. You can buy revival essential oils if the scent begins to fade after about a year.
They say fragrant oil, but they're actually essential oils - hence the "E".
 
TIPS:
 
~By adding a little powdered orris root, it helps preserve the fragrance for many years!
 
~It is important to mix some colorful petals that don't lose their color. Calendula flowers are perfect for this, as are borage flowers, nasturtiums, pansies, jasmine, and delphiniums.
 
~Dry your flowers and herbs in bunches hanging upside down in a dark, cool place that has access to a breeze. When drying rose petals, remove from the plant, and dry individually on a porous surface, such as mosquito netting or the like is a single layer out of the sun.
 
~Most important of all is to have fun and be creative! You can't go wrong mixing fragrances that you like!
 
Potpourri Recipes--
 
Spring Fresh:
Got Valentine's Day flowers? Dry the flowers and make a potpourri to last long after Valentine's Day is over!
 
2 cups pink rose petals
2 cups pink carnation petals
1/2 cup orris root powder
1 Tablespoon ground cinnamon
1 whole cinnamon stick (break into smaller pieces)
12 cloves
5 drops essential oil of roses
 
Lavender Love:
2 cups lavender flowers, dried
1 1/2 Tablespoons dried thyme
1 1/2 Tablespoon dried mint
1 1/2 Tablespoon dried basil leaves
1 Tablespoon ground cloves
1 Tablespoon ground caraway seeds
2 Tablespoons orris root powder
3 drops lavender oil
 
I hope that you all enjoy creating your own potpourri concoctions this spring! It is a wonderful creative outlet that lasts and is a sustainable way to use all the great blooms that you enjoy!
 
For more holistic health information and DIY projects head over to my blog or Etsy store!
 
April

Sunday, February 17, 2013

Guest Post | Heather @ Green Eggs & Goats

 
Hi, I'm Heather! I live on a 3 acre farm in Alabama with my husband and three children. We have 5 goats, 25 chickens, 2 guineas, 2 ducks, a dog, 2 cats and one very spoiled Jersey Cow! I blog about homesteading, homeschooling, design, decorating, and crafting over at Green Eggs & Goats.
 
I have been doing a makeover of my dining room, so I thought I would share with you today about the importance of paying attention to the details when you are fixing up a room.  So often, when we decide to update a room, we only pay attention to the big details like wall color and furniture.  Those things are very important, but it is the small details that make a room look polished, so here is a list to help you think about the small things!
 
You will never "hide" an outlet, but it doesn't have to stick out either!
 
Outlets!  This might be something you never give a second thought to, but you should!  For example, I installed bead-board wallpaper under my chair rail and painted it bright white.  I had cream outlets.  Yes, I could have just changed the covers, but let's face it, white covers and cream outlets don't look that great together.  My husband changed out the outlets for me, and the white on white looks great.  If I wasn't able to change the outlets, it would have been time to change my color scheme!
 
Floors!  In the case of our dining room, we were able to replace the tired blue carpet with some Trafficmaster flooring that we had leftover from another project. It was important to me NOT to have carpet under the table where we eat several meals a day. If new flooring isn't in the budget though, you do need to go ahead and take a good look at what you have.  Does it need a hands and knees scrubbing? Maybe you need to rent a carpet cleaner. Whatever you are working with, do your best to get it as clean as possible and it will make your room look more finished.
 
Caulk!  How do those windows and doors look? Molding? Ceilings? A $4 tube of paintable caulk can go a long way towards making a room look finished or updated. Caulk is easy to apply and probably won't take you more than half an hour unless your room is huge (or very caulk neglected).
 
Windows!  Let's go ahead and remove those fingerprints and doggy nose prints.  Wash at least the inside, but if you can get to the outside, it's probably a good idea to wash those too.
 
These are all the things that had accumulated on my hutch before.
It is just way too much stuff to all make the cut!
 
Accessories!  Let's really think long and hard about our accessories. Is it time to rotate our collection and look at something different for a while? Is it time to pull some things that you don't really love anymore? This is the hardest part for me, but when we go to dress our room, we really need to highlight our favorites and either store, sell or donate the things that we don't love.
 
The hutch is still a work in progress, but I know that "less is more" here.
 
Lighting!  Take a good look at those light fixtures. Do they give off enough light? Do they need to be replaced? If you have a brass chandelier, perhaps you should take it down and spray paint it to give it a new look. At the very least, make sure that all your bulbs work and that they all match each other! Do you have a combination of cool white, warm white and compact fluorescent bulbs? Maybe your fixture has 100 watt bulbs next to 60 watt bulbs. This seems minor, but it can make your whole room just look odd. Pick one to keep and stick with it!
 
I hope this list gives you some things to think about the next time you decide to update a room!  If you liked what you read, please check out my blog at Green Eggs & Goats where I host a weekly Farmhouse Style Blog Hop! I also blog for Grit Magazine.
 
Heather

Words On Sunday | Darling, Be Different


{photo via IHeartPrettyThings on Tumblr}

I love being different! {Except where the brain injury is concerned...that part I do not like so much...but most everything else? Yes, I am different!}

Saturday, February 16, 2013

Guest Post | Wendy @ Young Heart

 
Before I start, I'd like to Congratulate Helen and Autry!!!
Second, thank you, Helen, for the opportunity to do a guest post...

With that being said, hello friends, my name is Wendy and I blog over at Young Heart. I picked the topic of thrifting (a passion of mine that might border on addiction) because it's something I kind of excel at and it's also how I came to know Helen. :)

I've been scoping out second hand stores for over 20 years now... It started with a love of garage sales and not being too proud to dumpster dive. During the Ramen and Kool-Aid years, its how I furnished my homes and clothed myself. Even now as a financially stable adult (snort and chuckle), I still resort to thrifting for the bulk of my wardrobe and my home decor needs. It's a feasible and environmentally friendly way to live (win/win). Today I'd like to share with you my tried and true tips for an optimum thrifting experience..

#1: YOU MUST HAVE VISION. You need to be able to look at a piece and see where and how it could best be utilized. That blouse might look hideous on the hanger but perfect on you when paired with that cute little vintage cardigan you just put in your cart. That ceramic figurine might scream tacky but sell for big bucks on Ebay... This brings me to...

#2: Always carry your cell with you. This way if you're ever in doubt about a piece you can do a quick Internet search. The times I haven't done this, I've regretted it.

#3: Patience and Persistence. If you want to find that special something more times than not you're going to have to dig. Personally, I enjoy the hunt so this part doesn't bother me.

#4: Shop for summer during the winter and for winter during the summer. Reason being most people aren't looking for vintage cashmere or leather jackets when it's hot and humid out. The section won't be crowded and the prices might even be a little bit lower. With all of that being said, it's still good to scan all racks despite what time of year it is because you never know what you might miss. This brings me to...

#5: If you do miss out on that killer score (let's say, by seconds because someone grabbed it first), don't let it bring you down. The great thing about thrift stores is that there is an endless supply of new stuff coming in all of the time. There will always be another killer score. Trust me.

#6: If someone is checking out a piece that you're interested in and then puts it down and walks away - it's fair game. This sounds like common sense, right? Wrong! People can get a little crazy when thrifting; especially when stores are hosting the big 50% off sales. You have to graciously stand your ground. Might I suggest practicing your "death stare" as well?

#7: Storage issues. Do I hear exasperated sighs? In all honesty, I'm still tackling this one myself. As I look around our bedroom, I see numerous piles of personal clothes and stacks of containers holding items for resale. One thing I did was invest in a nice cedar chest (thrifted of course) to store my off season clothing, this way I have more space in our closet. I picked up covered bins for my store items so they'd be safe. Every so many months, I will have a garage sale to purge items (and make a few bucks) that I no longer have a use for. I've also dedicated one storage closet to thrifted home decor that I'm waiting to use. I'm open to suggestions on this so if you have any that don't involve paying extra for a storage unit, please send them my way.

#8: If you're into or considering resale, do your homework. Be on the look-out in the book section (of your local thrift store... which is cheaper than second hand book stores) for literature on antiques, fashion, home decor, etc. Get on the Internet and study. Get to know your product!!! Also, check other resale sites for price comparisons.

#9: Get to know the staff at the thrift stores you frequent. This way you stand a chance of getting tipped off when something you're looking for comes in. Say for instance you're in the market for a nice, leather sofa (they sell fast). If you're on friendly terms with the sales people they might let you know when a leather sofa arrives at the store. This way you can be there bright and early to check it out.

#10: Speaking of "checking things out" - this is a very important point to note. Regardless of what it is, (clothes, furniture, knickknacks) give it a thorough once over. Maybe even a second over; especially if you plan on reselling the item. With vintage clothing, look for moth holes, stains, tares, and check how the piece smells. Some odors, if extremely pungent, will not wash out.

#11: Don't be afraid to buy those gorgeous shoes or that awesome hat. There is nothing that a shot of Lysol or high heat won't cure of kill. It's all good. Except for thrifted undergarments... Even I have a line that should never be crossed.

#12: Look for inspiration in fashion and home decor magazines and websites (anywhere, really) then try and thrift it. More times than not you will find what you want. At least this has always worked for me. Also, anything and everything can be altered to fit your body or your home decor needs. A needle and thread can adjust that hem line and a fresh coat of paint and new hardware can make that desk look like something from Architectural Digest. It all goes back to the first and most important tip- you must have vision!

#13: More than anything: have fun with it!!!
 
Wendy from Young Heart
 
 
Feel free to email me on this topic {wendyahummel -at- gmail -dot- com}

Friday, February 15, 2013

Guest Post | Krys @ Keeping Plus In A Minus World

 
Hello there! I'm Krystal, but everyone calls me Krys. I'm from a little blog called Keeping Plus In A Minus World. I'm a fairly new blogger but everyone has to start somewhere right?! My blogging consists of some daily life to life with some of my furbabies, gardening, cooking & crocheting mixed in. I'm so honored to be a guest blogger here on Helen's Blue Eyed Beauty Blog.
Congratulations Helen on your wedding! :)
 
 
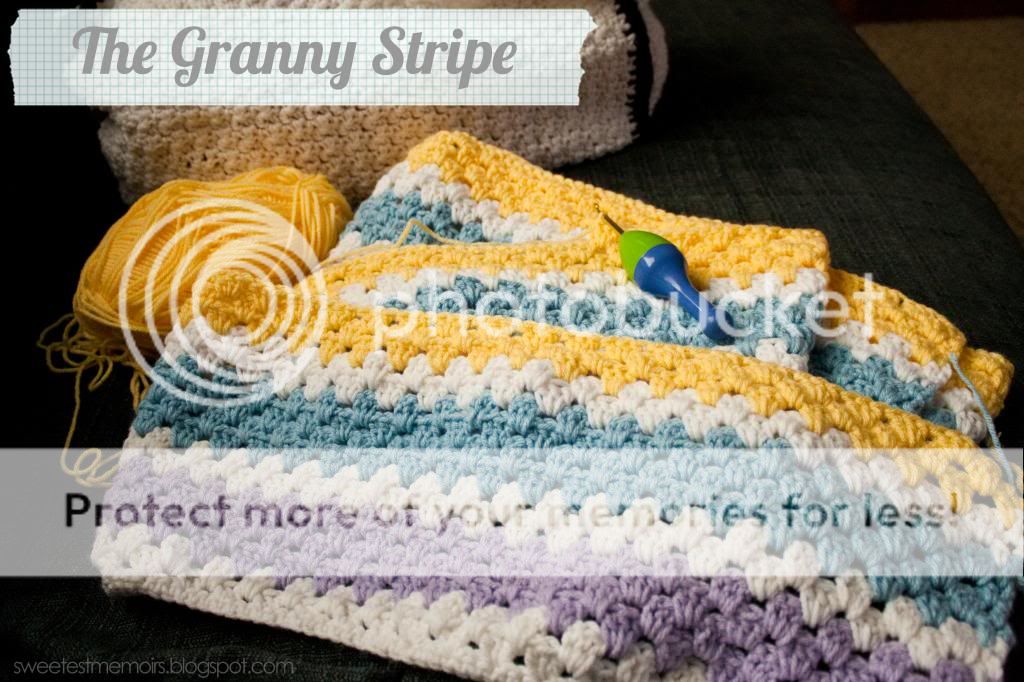
In today's post I'm going to attempt to show you how to Crochet a Granny Stripe pattern. If you are familiar with the Granny Square then this pattern will probably be fairly simple to you once you get the hang of it. I really like the looks of it & how quickly I was able to pick it up. I am currently working on a fairly large blanket, somewhere between full & queen sized so I'm not too far along on it yet.
 
For this demonstration I decided to start a little smaller so that I can show you step-by-step as much as possible. The trick to this pattern is multiples of three, plus two. For example, my blanket above started with a chain of three hundred plus two so 302 stitches. This is very important since if you are off by one or two your work won't like up as it should.
 
The stitches that you need to know for this project are Single Crochet (SC) and Double Crochet (DC). I don't really think it matters the size of the hook you are using. For this project I am using a size H 5mm hook.
 
 
So for this post I used a chain of thirty, plus two. I find that this seemed to be a good width for a scarf. Please feel free to chain as many as you need to make your project to your desired width. Just make sure that it is a multiple of three, plus two at the end.


After you have made your chain length, you want to skip two chains from the hook. Single Crochet into that third chain & all the way across your length of chain.

Once you have your single crochet's finished, you want to turn your work and chain 3.
 
 
Double Crochet once in the first space.
 
 
Skip two stitches, then double crochet three times in the next space. Skip two stitches, double crochet three times in the next. Continue along till you reach the last space. Double crochet once in that last space. Turn work...
 
 
Now here is where you can either chain three & continue with the same color for a thicker stripe, or you can cut your yarn & join your second color. Either way, chain three.
 
 
Double crochet once in that first space, skip two stitches, double crochet three times in the next stitch. Continue along exactly the same as the last row. Ending with one double crochet, turn.
 
 
Repeat the same steps for as long as it takes you to achieve your desired length. Changing color, turning & chaining three.
 
 
I'll probably continue this on until it's a nice scarf length, but for now I am going to pick back up on my blanket. I hope that this made sense & that you all are able to make some beautiful blankets or scarves too! :)
 
Thank you for reading! And thank you once again Helen for the opportunity to guest post on your wonderful blog! You'll have to come over to my blog & honor me with your presence as well! :D