Monday, April 21, 2014

Adding A Personal Touch To Baby Thank You Notes


My mom raised me to write thank you notes and I remember writing them all the time as a kid. However, since moving out on my own I have had a difficult time keeping up with thank you's. For example: I still haven't written wedding thank you's even though I bought the cards and stamps right away. I know. That's awful... The reason they aren't done right now? I lost the list of people I was supposed to write thank you's to!

I thought these Hallmark cards {I bought at Walmart} were appropriate for sending boy thank you's!

Anyway, I promised myself I wouldn't take so long to send out thank you's to all the people who gave us gifts for Little Man. And at three months old his thank you cards are written, signed, and waiting for stamps so I can mail them off! I feel quite accomplished!

I wanted to add a little something from LM. I thought putting a tracing of his hand in each card would be the perfect thing to do. Little did I realize how difficult it was to hold a child, hold their hand and trace their hand all at the same time! If you try doing this then I suggest getting someone to hold the baby while you do the hand holding and finger tracing parts. That's what I ended up doing and it worked out SO much better.

Here is a pic of us holding his little baby hand in the right spot so we could trace his fingers. It was a little difficult, but they turned out really cute and I'm glad I did this!


After it was done I wrote his name and put "3 months" in the hand print so the person receiving the card would know how old he was when it was traced. I thought this was especially cool since most of the gifts we received were from out of state friends & family who don't get to be apart of his every day growing up (I'm from Oklahoma, hubby is from Mississippi).


I just wanted to share this with you all since I thought it was a neat idea. I didn't see it anywhere or anything like that. Usually my ideas stem from Pinterest stuff, but not this one! It's all Blue Eyed Beauty original!!!

This Post Was Shared!

Saturday, April 19, 2014

DIY No-Pin Skirt Hem


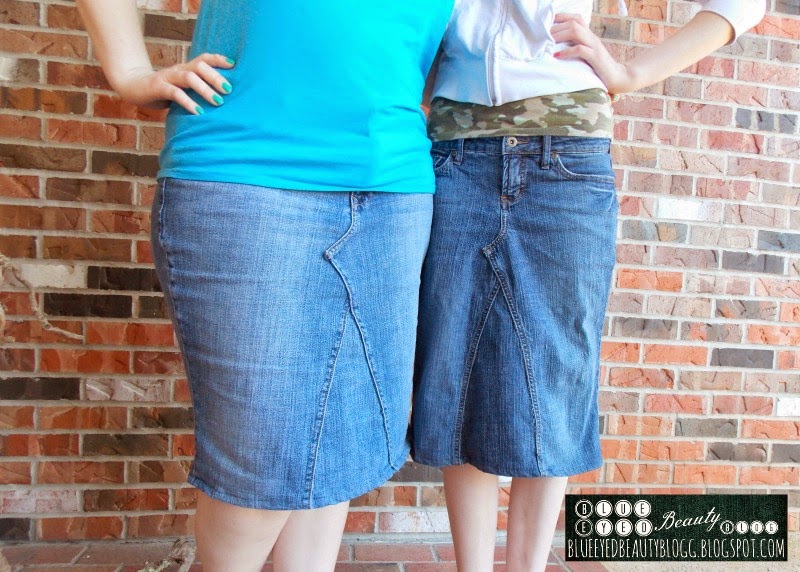
I recently made a LOT of new jean skirts. Most of them have been for myself, but I made some for my little sister, and some for a few other people. One day I was really getting frustrated with pinning the hem of a skirt so I decided to try something new. And it worked so well that I made the rest of the skirt hems the same way!

Step 1: Make your skirt! If you're doing a denim skirt from jeans, go ahead and do all the steps up to making the hem line. If you need a tutorial I have several to choose from:


Step 2: Once your skirt is made up to the point of being hemmed, go ahead and check the bottom to see that the inserted pieces are fairly even with the leg part of the pants. I know the bottom of the skirt in this photo doesn't really look even, but it is.


Step 3: Take the skirt to the sewing machine. Start on either one of the side seams and fold it over just as wide as the presser foot of your sewing machine. **Hint: You don't start in the front or back because it will be more obvious when you're finished.


This is the edge of the skirt where you should start sewing. I used a pin to hold flat the flaps so you could see what it should look like before you sew. I only used the pin so I could take the photo.


Step 4: Sew around the bottom of the skirt, keeping the fabric folded so that it is just as wide as the presser foot all the way around the bottom. Once this is done continue on.


Step 5: Now, fold the hem part that you just worked so that the folded edge is even with the left side of the presser foot and the bottom edge is even with the 3 mark on your sewing machine. Start on one of the side seams (see hit in step 3) and work all the way around, keeping the fabric even as you go.

The underside of the skirt will have two lines of stitching, but the top or outside of it will only have one.

Step 6: Remove any excess threads, and you're done!

Here are some photos of the finished skirt hem:


And here is a photo of my sister and I rocking some of our other skirts where I used this same no-pin skirt hem:


This Post Was Shared!

Friday, April 18, 2014

Cloth Diapering | Getting The Stains Out


Since we've been cloth diapering I hadn't figured out how to get the stains out of the diapers. Being the forgetful person that I am, I didn't put bleach in the diapers when they were being washed in the washer for the first two months. I kept meaning to do that, but every time I went to wash diapers it wouldn't even cross my mind to add bleach to them. Well, one day I finally did remember to use bleach in the diapers and my stain problems are  now resolved!!!

Little Man has yellow poop. It can be quite gross, and the worst part was when there were poop-explosion-diapers with it everywhere! Ugh. I hate changing those, but it's even worse to clean them out! Yuck. Anyway, because of these PED's almost all of the cloth diapers and their covers had yucky yellow stains on them. It was quite annoying. I will say that with one wash almost all of the diapers came out sparkling white again (there were a few that had light hints of stain, but after being washed the next round with bleach they look fine too). I've taken a comparison photo so you can see the diapers as they were before I did one bleach washing and after that wash cycle:

Even our cat, Demi, prefers the bleached diapers! I picked him up and moved him several times, and each time
he went right back to the bleached diaper!

Bleach will now be a regular part of the wash cycle! I have been using just a little bleach in every load of diapers that I wash. So far I have no bad things to say about doing this. The diapers almost always look great (occasionally when there's a really bad PED diaper they have a little hint of stain...they are clean, but a little stained. The next time I wash them with the little bit of bleach the stain goes out the rest of the way).


I just wanted to share with you that bleach does really make a difference in how white the diapers are. I just used off-brand bleach from Walmart. Nothing fancy. I wash the diapers on a small load, add in 1 cup of my Homemade Laundry Soap and I add in about 1/4 cup of bleach now. Those first two times when the diapers hadn't been bleached at all I did about 1 cup of bleach for the whole load.

I'm happy to report that things are going well with cloth diapering and I'm really glad I started using bleach regularly. That makes a huge difference in their appearance... Not that anyone besides me really sees the diapers, but I didn't like them being stained so it's nice to see them all fresh and clean!

Note: I use Econobum Cloth Dipaers which are sold online through Walmart.

Second Note: I do not use bleach in every washing as I have learned it will wear down the diapers quicker and make them not last nearly as long. I do use bleach when there are PED diapers in the mix, but not always.

Related Posts
Cloth Diapering | 10 Diapers Researched

Thursday, April 17, 2014

Candy Filled Easter Eggs

Over 400 hundred eggs and almost as much candy!
Notice our cat, Demi, in the background sniffing all the eggs. I swear he thinks he's a dog!

As this Sunday is Easter I thought I would share with you a few photos from stuffing our eggs with candy for the hunt we will be having at our house this year. I am really excited and do hope the nieces and nephews are able to come to find all these eggs!


I bought the 'good' candy as well all call it. I got one bag of chocolate candy and the rest is all tootise roll stuff. I didn't realize until later that the dots & suckers don't fit in even the giant eggs so I just put an empty egg in the mix for each of those items and will let the kids pick out what they want if they get empty eggs when hunting.


The peach egg is a 'giant' egg and holds most of the bigger stuff like the big tootsie roll logs. The yellow egg is the medium size and holds almost everything except the big stuff. The green egg is a miniature egg and holds most of the small tootsie rolls and nothing else.


Hubby wanted the eggs counted so we wouldn't end up with eggs in the yard for months to come. As I filled them I set them to one side until I had a new set of ten and then I'd add them to the box below:


As I filled the eggs I would put them in the big box I had for them. As you can see, it was quite empty to start with, but it filled up fast!


It's probably gonna take awhile to get all these eggs hidden, but I'm sure the kids are going to have a blast!! We have one 'secret egg' which is a giant egg with a miniature egg and medium egg inside it (like those Russian dolls). The person who finds that will get a giant 2lb. Chocolate Easter Bunny. I can't wait to see who ends up with that!

Wednesday, April 16, 2014

First Week of Working Out Consistently In Over A Year

9 or 10 weeks after giving birth. Around 200 pounds, maybe?

Okay so I know that's a really long title for this post, but that's what this particular post is all about! I'm thinking that the first six months before I got pregnant I didn't work out at all. It might've been longer than that, but I really can't remember so we'll just assume I didn't work out for six months before pregnancy. Then, since I hadn't been doing anything before I got pregnant, when I found out I was pregnant I didn't want to start doing anything new. I probably could have, but didn't. On rare occasions I'd go for walks around the apartment complex, and then we moved to the country and all physical exercise stopped completely.

I think it's safe to say I haven't worked out in well over a year. Most of this is due to pure laziness. During pregnancy I gained almost 50 pounds. My midwife told me this was normal, but now that we're three months after giving birth I'm not feeling so great about my body and all this extra weight makes most of my pre-pregnancy clothes not fit properly.

I wanted to give myself plenty of time to recover from giving birth. For me, it was a hard birth and I had a lot of tearing which took it's sweet time in healing. Having fibromyalgia didn't help with that either. Nerve pain was horribly uncomfortable in those areas so any kind of movement for the first two months after birth was awful! During the third month I was starting to feel a lot better, and that's when I decided I needed to start working out.

I knew right away what I wanted to do, but getting there presented a little bit of a hurdle. Not only was my favorite Jane Fonda Aerobics workout on a VHS tape, but I didn't have a VHS player to hook up to our tv. On top of that? The bulb in our main tv decided to go out so I really didn't have a way to plug in a VHS player if I had found one! (We have a tv in the basement, but it weighs like 300 pounds-so it wasn't coming upstairs any time soon-and until recently I've avoided the stairs because they usually promoted that uncomfortable nerve pain again.)

One day, when I was starting to feel desperate I decided that the next time I was online I'd try and see if I could find the Jane Fonda workout on youtube. I didn't write this down, so the next week or so went by and those few times I was online I forgot to look. Finally I did remember to look and I FOUND IT!!! The next problem? Figuring out how to download the video so I could use it at home where I don't have internet. This took some work, but I did get it figured out. The quality of the video isn't fantastic, but it's good enough that I can follow along without any problems and that's all I needed!

So... On the last week of March I decided I would start working out with the video. Little Man was 11 weeks old and I figured it was time to start moving. Hubby had brought my ab lounge up from the basement the weekend before, but I had been busy with the major master bedroom redo project (see Part 1 here) so I didn't use it right away. Years ago one of my best friends and I would say, "we need to start working out again... let's start on Monday." Then we'd discover that that day was Monday and we'd say, "let's start next Monday!" We did this so many times. I think we eventually did start working out, but the point is: Monday and I do not get along well for starting new things! I decided Wednesday would be my first workout day instead. I hate middle of the week start-ups, but I had to do something I knew I wouldn't talk myself out of (such as the starting on Monday thing).

My current goal in working out: Complete the 40 minute Jane Fonda Aerobics Workout video and do 3 sets of 10 on the ab lounge. I want to do this 5 days a week. I chose Sunday, Monday, Tuesday, Wednesday, and Thursday. If I want I will have Friday & Saturday off (those are the days hubby is home and I'd rather spend time with him), but I could also workout if I was feeling up to it. I want to keep with this routine for four weeks and then I want to up the amount of reps I do on the ab lounge.


This is 9 or 10 weeks after giving birth. My 'before' photo.


Workout Info for Week 1
Wednesday, March 26th: JF Workout, 3 sets of 10 on ab lounge.
Thursday, March 27th: JF Workout, 3 sets of 10 on ab lounge.
Friday, March 28th: Did major grocery shopping = lots of walking and lifting.
Saturday, March 29th: nothing! day of rest.
Sunday, March 30th: JF Aerobics Workout, 3 sets of 10 on ab lounge.
Monday, March 31st: 3 sets of 10 on ab lounge, JF Aerobics Workout.
Tuesday, April 1st: nothing.
Wednesday, April 2nd: nothing. Weight: 196 lbs.