Wednesday, August 28, 2013

Wednesday Weekly Review #33


Today I wanted to share with you a few links from readers who are following my blog & are also bloggers! Not long ago I was sitting at 393 followers and I'm getting close to crossing that line into 400+ followers. It takes every follower to make up the numbers so today I wanted to say thank you to some of my readers!


Living The Gourmet is a food blog full of delicious recipes which are put together by Catherine & Tammy. There is a whole variety of recipes from desserts, to sides, to fancy dinner ideas...if you love to cook, but just want a recipe and not the experimental process this is a blog for you! Here is one recipe I really want to try:


Check out this Fresh Tomato Salad from Living The Gourmet.


Mary writes over at Homegrown On The Hill. With Hubby & I planning to move out to the country I've really enjoyed reading her experiences in raising rabbits & chickens, and gardening. She is an inspiration to me! She also regularly co-hosts the HomeAcre Hop each Thrusday:


Those are my features for this week! I hope you enjoyed reading a little about the blogs I like following along with.

Featured? Grab a Button!
On the left sidebar click the "grab a button" tab (or click the link) and scroll down to the "I was featured @ Blue Eyed Beauty Blog" button to share on your blog!!!

Interested In Seeing More Blogs?
If you loved these blogs, you may enjoy the other's I've featured since the birth of The Wednesday Weekly Review. How can you find them without going through each post? Easy! Just view all the buttons on my Pinterest board: Blogs I've Featured!

Tuesday, August 27, 2013

Cherry Cheesecake


I think my old sweet tooth is coming back to life. When I first got pregnant I couldn't eat hardly anything that was sweet because it would make me sick. Occasionally I would eat a rice krispy bar, but over all I couldn't handle eating desserts. This recipe is one I made on the fly without any inspiration. It turned out SO good, you'll have to try it and let me know what you think.

Ingredients
1 8oz. package cream cheese, softened
1 Tablespoon lemon juice
½ cup powdered sugar
1 pkg. crescent rolls
1 21oz. can cherry pie filling

Directions
1. Grease an 8x8 glass baking dish.
2.  Preheat the oven to 350 degrees.
3. In a glass bowl mix together cream cheese, lemon juice, and powdered sugar.
4. In the greased baking dish, line the bottom of the pan with half of the crescent rolls. Press them out so they fill the whole bottom of the pan.
5. Pour the cherry cream cheese mixture on top of the crescent roll crust. Spread evenly.
6. Take the remaining crescent rolls and press them out on a flat surface. Lay them on top of the cherry cream cheese mix.
7. Bake the Danish in the oven for 35 minutes.
8. Refrigerate before serving.

Monday, August 26, 2013

FAIL | Cardboard Claw Scratcher


Okay so I'm not really sure what the thing is called, but Emerald ignores it worse than she ignores me, so that's gotta be bad! When we got Emerald she had all of her claws. I was a little worried about this because I'd never had indoor cats and I'd always heard they scratched furniture. We had bought a new-to-us couch which was in great shape and I seriously didn't want it scratched up. We were told that Emerald was a good cat and hadn't scratched the furniture of her foster parent's home so I was less worried about this...we'll it turns out that she DOES scratch on furniture...


Autry & I were at WalMart shopping for groceries and the monthly round of kitty litter (I need to write about finding kitty litter, but that's a whole different issue) and we saw the kitty toy section. We were looking at these different things and saw this little box which was supposed to be something cat's would use to scratch on vs. using the furniture. Its called the Super Scratcher by Smarty Kat. It had catnip on it which was supposed to help them want to use the cardboard as their scratch board for their claws. We tried & tried, but couldn't get her to do anything to the $6 dollar box of cardboard except chew on it! I have to say that was a really frustrating since I already had problems with her chewing on cardboard boxes. Thank God it's just cardboard though and not something more expensive.

Emerald chewing on the edge of the box.

We have talked about having her front claws removed, but with moving to the country we were both concerned about her getting out of the house and then having no way to protect herself...so the claws are staying. I am just going to have to come up with something more clever to keep her from clawing up the back of my couches!

Sunday, August 25, 2013

Saturday, August 24, 2013

This Is Me | Housework


So ever since I've lived with Autry at our apartment I've discovered something that I didn't ever think was possible: I hate housework! There, I've said it... Washing dishes is the worst, but using the vacuum, cleaning the bathroom, and dusting just aren't my friends. I do, however, don't usually mind folding laundry. It's not my favorite chore, but it's something I'd rather do over everything else.


So with moving to the new house I've decided that things will need to be different. I'll be working on a few ideas to help me keep a better handle on having a clean house. Things like make an erasable check-off list that I can work on each week. I also was considering doing a jar with the name of each room on it and then each day picking out a paper (or whatever I use) and doing the chores for that room. Like I said, who knows how these things will work out, but maybe something will help. I guess we will see.

Friday, August 23, 2013

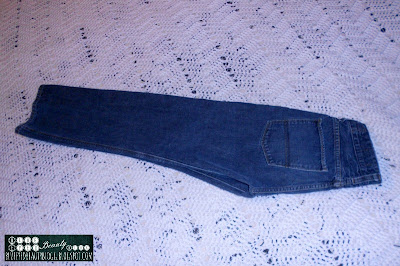
Homemaking 101 | How To Properly Fold Jeans


Today I wanted to share something a little different: a tutorial on how to PROPERLY fold jeans. You're probably thinking, "well, I already know how to fold jeans so I'll just skip this". And you probably do...but do you know how to fold them like the Denim Queen from Old Navy? Probably not... It took quite a bit of time to figure out how to fold jeans to make them stack up in straight little rows on the denim shelves at the store, but I eventually figured it out. And yes, I was the Denim Queen...in case you were wondering.

Homemaking isn't only about creating beautiful rooms in the house, it's also about doing old boring chores like folding laundry. I'd rather do laundry than dishes, but that doesn't really mean that I like doing laundry. I thought about doing a series on how to fold different articles of clothing, but really I only have very specific ways I fold jeans, towels and t-shirts...(well, and underwear too, but that's not something I'd really like to blog about, you know?). Anyway, today's post is about folding jeans so enjoy!


Okay so on to the tutorial...here is how you can fold jeans like a Denim Queen...if you practice. :)

When you're first starting out learning how to fold jeans like this you'll probably want to start by laying them on a flat surface. Once you've done this a few times you'll be able to fold them without props like a table or floor...but using one of those rolling table things sure did help when you had hundreds of pairs of jeans to fold.


First, lay the jeans out flat.


Second, make sure, if nothing else, that the button on the jeans is done up. If it's not buttoned you may have trouble in the rest of the folding process...just saying. Coming from a pro: button up the jeans BEFORE you fold them. (The zipper being zipped really doesn't matter.)


Third, fold the jeans over in half.


Take the ends of the jeans and fold them up to half-way-up the pockets of the pants. You don't want to go higher than half-way because then the jeans just won't lay right in the stack.


Fold the rest of top of the jeans down to meet the middle of the bottom fold. And there you have it. Now if you're folding to stack on shelves you'd do this slightly different, but overall this is how I still fold jeans and it works amazingly! Sometimes I miss my old job of folding denim...

Anyway, that's how you can fold denim like a Denim Queen...if you're interested. :)

Repin this post on Pinterest here!

Thursday, August 22, 2013

Cherry Muffins


Recently I was really in the mood to bake some muffins...but I wanted them to be different from what I usually make (which is Blueberry). These muffins turned out both delicious and gorgeous. I think they would be perfect muffins to make for Valentine's Day breakfast which is something I just may have to do next year! :)

This recipe makes about 32 muffins.

Ingredients
4 1/2 cups flour
1 cup sugar
1 cup brown sugar
1 heaping Tablespoon baking powder
1 cup (2 sticks) butter
1 Tablespoon vanilla flavor
1 teaspoon almond flavor
2 eggs
2 cups milk
21 oz. cherry pie filling

Directions
1. Preheat the oven to 350 degrees.
2. In a large bowl mix together the flour, sugar, brown sugar, and baking powder.
3. Melt the butter in a microwave safe bowl. Stir in vanilla & almond flavor. Add in eggs, 2 cups of milk.
4. Pour the wet mixture into the dry mixture. Mix until everything is smoothly blended.
5. Stir in the cherry pie filling, but don't blend it all the way so that the finished muffins will have the marbled look to them.
6. Grease 24 muffin tins. Using a 1/4 cup measuring cup scoop the batter into each muffin tin.
7. Bake the muffins for 20 minutes. Check one with a toothpick to make sure they are cooked all the way. If they're not cook them for about 3 minutes (you shouldn't have to do this).
8. Let the muffins cool on a cooling rack once they're baked.

One more photo of the muffins as they were pulled out of the oven:


Repin this recipe on Pinterest here!

Wednesday, August 21, 2013

Blogging Tips | Setting Up Your First Blog


This post is something that I've wanted to put together for a really long time. It's just taken me a REALLY long time to get done! Learning the tricks of blogging can take a long time. I've only been blogging since February 2012 and already it's late August of 2013! It's been a good learning experience & I think I've come a long way in the blogging world, but what's important to me are the relationships I've built with my readers & the friends I've made throughout the journey.


If you're a brand new blogger, or someone who is considering blogging you may not know where to begin or what to do. There are so many things you CAN do that it makes a first time blogger very nervous! I've learned a lot in the year+ that I've been blogging and now I want to take that and put it down into something that would hopefully help a newcomer to the blogging world.
  • Create your Google Account. If you don't have one already this is the best place to start. You just fill out the sign up from and you're good to go! Log out of the account once you've made it. Make sure to write down your login email & password because you'll need this later.
  • Go to blogger.com. You will then see a screen that says create your free blog. On the right will be the Google sign in. Fill this in with your new account info that you created just above. (Email & password.)
  • Create the New Blog. Now on this new screen you will have a button near the top left which says "New Blog". Click that. Fill in the two blanks: Blog Name, and Blog URL. The name should be something that can stay with your blog as it grows. The URL should be something easily identifiable to your blog name if you cant have the exact blog name as the URL. (Sometimes other blogs have already been created with the name you want to use so you'll have to get even more creative!) Before moving on you will  need to pick a Template. I usually use Awesome, Inc. Templates because they're easy to work with AND awesome!
  • Know where everything is. Click on the name of your blog which will automatically appear at draft.blogger.com once you've created a blog. Here's a quick look at what each of the things on the left sidebar:

    ~Overview: This is where you can see a quick look at the page views your blog has received, and know when/if you have comments needing moderation. You can also see an overview of how many comments have been published on your blog, how many page views you received today, the number of posts sitting in draft/schedule or published on your blog, and the amount of followers via GFC.

    ~Posts: Keep track of the posts you've written, posts you have in draft, and post you have scheduled. At first you may only see "All" and that's okay. Once you start writing you'll see the other tabs pop up.

    ~Pages: This is where you can rearrange, edit & add pages to your blog.

    ~Comments: You can view comments by ones that have been published, ones that are waiting for moderation, and ones that are marked as spam. To help avoid spam comments you might not want to allow annonymous comments OR always moderate the comments posted on your blog so you view them before anyone else...more on this later.

    ~Google+: Now I haven't exactly used this because I don't have a Google+ account. It says that you can "connect your blog to Google+ to reach more readers in new ways". I'm not sure how anything here works.

    ~Stats: As a new blogger you really SHOULDN'T pay too much attention to the stats of your blog. Later on you may use it as a way to track where your page views come from or what posts are the most popular, etc. It will also show you traffic sources, page views on posts & on blog pages, an your audience around the world.

    ~Earnings: Again, this isn't something that I've done so I don't know anything about this tab or how it works. I would suggest finding a blogger who has ad's on their blog and asking them about it for more info.

    ~Layout: This is a fun tab! You can add or remove a LOT of different things to your blog all by using this tab. You can also make changes to your blog header and how many posts are displayed on your blog's homepage here.

    ~Template: Remember when you picked a template for your blog? Well, this is where you go to make changes to it or edit other things which have to do with your blog's appearance. You'll want to click "Customize" NOT "Edit HTML" unless you know HTML.

    ~Settings: Everything from changing the name of your blog, the URL of your blog, adding/removing contributors to the blog, editing details about comments (who can comment, etc.), posting using a mobile device, changing the time, and whether your blog will show up in search engines can be found here. Take some time to look around and see what all the options are.
  • The Basics of Pages. Some of the most common pages added to a blog are "About Me", "Connect" or "Contact", "Link Parties", "My Wedding", "Recipes", "Crafts"...there are limitless options! Just decide what things you want to write about on your blog (topics you are most familiar with are best!) and start there. I'd for sure put an "About Me" and "Contact" for a new blog. Everything else is extra & can always be added later.

    ~Create A New Page: On the Pages tab you will see the button "New Page". Click that. Add a title for your new page and begin writing on the blank space below.

    ~"About Me" Pages: This is a page where most people will go to get to know you better. Share a few highlights of your life, things you want to blog about, things you want to do, places you've been, any other random thing you might want to add. Most importantly INCLUDE YOUR NAME! If you don't want everyone knowing your real name create a code name for yourself and use that on your blog and to leave comments with. I would also suggest adding a photo of yourself, but again that's totally up to you.

    ~"Contact" Page: on your contact page you might want to share your email or an email you've created specifically for blogging & chatting with other bloggers. Blogging is a very social event, but it's difficult to be social if people can't get a hold of you! Other things you might want to add are links to social media sites you use such as Twitter, Pinterest, Instagram, Polyvore, etc. You chose what you want to share.
  • What & When to Write. Sometimes new bloggers feel pressured to write a lot and they'll easily burn out and never write on their blog again. I suggest taking it slow! Start with an introduction post or a post about your plans for your blog. Write lots of draft posts that don't necessarily get published right away. Take photos of craft projects or recipe's as you're working on them so you can blog about them later. Blogging is not hard! It should be fun. You should enjoy what you write about. If you don't know about a subject DON'T WRITE ABOUT IT! Simple as that! The biggest thing I learned was this: I have to write for me. If I came across my blog and had never seen it before, would I want to stay and read any of the posts? If your answer is no then maybe you should reevaluate the topics you're writing about. If it's yes, then good for you!
  • Helpful Resources on BEBBlog. I wanted to share a few tips with you that I've written on my blog over the past year+. These are things that I've learned & dediced to blog to help other bloggers. If you have questions about something or have a comment to share with new bloggers please leave them below & we'll talk!

    ~The "Follow Me Back" Curse. As a new blogger you may be tempted to follow other bloggers so that they'll 'follow you back'. If you want to do that, go ahead...the only thing I'd like to say on this is NEVER say "follow me back" or "follow me I've followed you" or "stop by my blog if you can" or anything even close to that! It's rude to ask for visitors to your blog, and in many cases this is one sure way to make sure the blogger whose blog you commented on WONT ever visit your blog! Read more about that here.

    ~Give Credit Where It's Due. One thing you may start to join in are the link parties & blog hops which are all over the blogging world. I attend many of them myself and enjoy visiting new bloggers this way. If you are going to link up with a blog hop/party, make sure to follow the rules of the hop & add the button to your blog (adding them to a specific page is always a good idea and keeps your blog's homepage from looking too messy). If you link specific posts to link parties go back to that post and add a text link which will take the reader back to the party where you linked up at.Not only is it courteous to do this, but it'll help you remember which posts you linked up at which parties so that you don't link them multiple times! Read more about this here.

    ~How To Find Your RSS Feed. If you decide to add custom social media buttons to your blog you may be wondering how to find your RSS feed since this is something that a lot of readers use to follow your blog. I've written out details for you here.

    ~Blogger Photo Limit. Another important thing you'll want to start doing when you first begin blogging is to make sure your photos are sized 800x600 (600x800) or smaller! If your photos are larger than this they will take up space in your Picasa album (which is provided via Google and works with Blogger) and you'll run out of space and either have to buy more space to store images or go back and resize all the ones that are too big. Read more about that here.

    ~Create A Blog Button. If you plan to advertise (and there's plenty of opportunites to advertise without paying a dime! Plus the whole button swap thing where you host another bloggers button on your sidebar and they host yours is free too!) you'll probably want to create a blog button. You'll have to mess with a little HTML, but I've written out directions which most people don't find too confusing so feel free to check that out and make your blog a new button! I'd suggest using a photo editing program like Picmonkey.com (which is free) to get going. Make sure to save as .png if you use solid colors instead of an image so that it won't go pixily. Read about creating a button here.

    ~Schedule Posts to Publish Automatically. Do you wonder how bloggers have the time to write so many posts and publish them throughout the week/month? Let me tell you a little secret, we use the Schedule feature A LOT! (Or at least I do!) This gives me the freedom to write tons of posts in advance and then line them all up on the day and at the time I want them to go live on my blog. Read how to do that here.

    ~Add The "Pin It" Button. If you plan to use Pinterest to promote your blog (or if you want to share your blog posts on Pinterest) I'd suggest you add a "Pin It" button to your posts. This makes for easy sharing of your blog posts for you and for your readers. Learn how to add the button here.

    ~Posting A Comment. Now that you're a blogger you have no excuse to post comments as annonymous. Make sure your family members (who might read your blog) know how they can leave comments too! Read the post here.

    ~All About Favicons. This is the little image that pop's up on the open tab along the top of your browser. If you wondered how bloggers got a unique image to pop-up instead of the Blogger logo...wonder no more!

    ~How To Center Buttons. When you start adding buttons to your sidebar you'll probably notice that they end up all over the place. That's because the HTML code for each one is unique (even if you make them yourself!). Learn how to center buttons here.

    ~What Is Picket Fence Blogs? It's a place where your readers can vote for your blog and as your blog is voted on it will rise in the ranks of different categories. This isn't something for everyone, and as a new blogger you might want to wait on this until you're estabilshed (aka you have your blog layout set up, your pages finished, and a few posts under your belt). Learn how to set up an account & profile here.

    ~Custom Clickable Buttons. As you become more familiar with HTML code and how to use it you may decide you want to create a few of your own custom clickable buttons. I know this is TONS of fun and something I use a LOT on my blog. Read the tutorial here.

    ~More Blogging Tips. I wrote 3 collaberation posts which share several different tips for blogging. Some I've already mentioned above, but a few I haven't. Check those here: Top 5 Blogging Tips #1Top 5 Blogging Tips #2Top 5 Blogging Tips #3.
I hope you're not too overwhelmed at this point. If you are just take a deep breath, walk away from the computer for a bit and come back to this later. You can always copy this post into a word document if you want to use it as a checklist. Then you can just remove the parts you've completed until you get it all done... Do what works best for you. It's your blog and blogging is all about being unique!

Repin this post on Pinterest here!

Tuesday, August 20, 2013

Snacking Healthy | Creamcheese Graham Crackers


Okay so I realize that some people don't consider cream cheese to be healthy, but really it's not HORRIBLE for you as long as you don't eat it all the time. It has some fat in it, but if you're craving cheesecake and don't really want to make one or eat all that sugar then this is your new best friend!

Oh, by the way I've decided to turn "Snacking Healthy" into a new series. Notice the new header? I figured that since I do write a post in this series every now and then that I could turn it into a full blown series.


Ingredients
2 full graham crackers
Softened cream cheese
Cinnamon for sprinkling

Directions
1. Break the graham crackers into four pieces.
2. Spread the cream cheese over them.
3. Sprinkle with a little cinnamon.
4. Enjoy!

Monday, August 19, 2013

The Survivalist Post #9 | Sensible Stockpiling


Awhile back I was doing some shopping and picked up a few things to stock up. I'm sure many of you know all about stocking up, but if you don't let me tell you it can be quite expensive if you try to 'stock up' all in one day! Building a stock pile of sensible things is never a bad idea. You never know when your stash of toilet paper under the bathroom cabinet will run out, or one day you'll suddenly realize your toothbrush needs to be replaced but you don't have extras. I'm talking about stockpiling every day things.


Stockpiling means something different to everyone. To me it's the difference between having something and running out of it. Clothes pins break, toothbrushes go flat, matches burn, and tampons...well, no explanation needed there. All of those things are something I like to have a lot of on hand because they get used or broken and need to be replaced. The only other thing in this photo that wasn't a usual 'sensible stockpiling' buy are the water purification tablets. I happened to buy those because I FOUND them and sometimes they're hard to find at the store, and I needed them for my BOB.


A quick tip on the Water Purification Tablets, you probably won't be keeping them in their package so make sure to label the tops of the bottles with a sharpie so you'll remember which one to use first.

Okay so back to stockpiling sensible things. I have a running list of things I want to pick up if we have extra money by the time the rest of the shopping is done. I don't always get something from that list, but it's still there. I thought I'd put together a list of sensible things to stockpile.

Sensible Stockpile Items
Toilet Paper
Tooth brushes
Shampoo, Conditioner, Body Wash
Bars of Soap
Laundry detergent
Bleach
Tampons (feminine products)
Matches
Gallons of Water
Dish Soap

What are things you'd stockpile?

Sunday, August 18, 2013

Saturday, August 17, 2013

Road Trip: Mississippi

Autry drove practically the whole time, and that was just fine with me!

In May Autry & I took a little road trip to Mississippi. I had only met a handful of people from his family this past February when we got married & I was anxious to meet the rest of them. He has a HUGE family! He always told me that, but for some reason it didn't really sink in until I started to meet them...one by one. He has a lot of family! :) Not saying that's a bad thing either. I really had a good time with his family. We played phase 10, went shopping at thrift stores and ate a lot of great food too.


We crossed several state lines. Arkansas was the one we stopped at on the way down. We missed the Tennessee state line when we were headed down because of car trouble. We were too focused on trying to find somewhere to get the car looked to even think of getting a photo at the road side sign.


I think I look pretty good for hopping out of the car the second we saw the sign.


Autry didn't want to take all the pics, but I finally convinced him. I like photos. They're nice to have. We didn't know I was pregnant yet. It was sure an uncomfortable car ride though. I've had rough car rides before, but this one felt different. I kept telling Autry I wasn't sure but I was sure ready to find out.


One more snapshot of the sign before we got back on the road.


We drove across a lot of really cool bridges in Arkansas. This is the one of the few pics I snapped that worked out. I love these bridges! I think they're really pretty.


I snacked on homemade mini chocolate chip cookies & crunchy Cheetos on the way down. To this day I don't understand why I ate those things together. Until I got pregnant I don't think I liked mixing sweets & salty together? I honestly can't remember.


This photo didn't turn out half as good as the real thing, but the trees. Oh my gosh! The trees! There were so many of them! Autry always told me about the trees growing right along the road, and when we got REALLY in the south (where he's from) they do.


One of the first places we stopped the day after we got in was to drive by where he used to go to high school. It was really interesting seeing where he went to school. We didn't go in past the gate or anything, but it was still neat.


One of the first days we were there we went and saw our niece, nephew, his sister, mom and grandma. I had met them all previously at the wedding, but it was still nice to spend time with them again. We had pizza that first day I think. She was trying to be shy, but didn't really have far to go before I snapped a pic.


Nephew had a hard time with the flash on the camera. I couldn't get him to keep his eyes open long enough for me to get a pic, but I thought this was cute.


One day Niece came over to where we were staying. She got quite tired and feel asleep in the bed. It was so precious!


Nephew & Autry spent a good bit of time swimming in the pool. I would've went swimming but it was MUCH too cold for me!


These delicious looking tacos were made by Autry's aunt. They were SO good!
Notice the Phase 10 cards? We played that a lot while I was there.


One night Nephew & Autry we sitting together watching a movie. They used to do this all the time before Autry moved up to Missouri.


While we were there, Autry's cousin's Chase & Mallory had a craw fish boil while we were there. Let me just say that I didn't try it because I'm allergic to shell fish. I have TONS of photos from this event which I might write a separate post on it.


Of course on Mother's Day we announced that we were expecting our first little one. Everyone was really surprised & equally happy. It was a fun way to tell everyone.


Autry's sister bought a cake for my birthday. I was quite surprised! It was pink & camo. :)


Chase, Autry's cousin, made some of his famous spaghetti. It's really soupy & has some spice to it, but really wasn't too bad. (I hate spicy food, but I was brave and tried it.)


My birthday was May 14th. Autry bought me the stuff to make Italian food (my favorite).


A pic of me on my birthday. Autry bought me flowers and a teddy bear. :)


This is me and Autry's cousins little boy. He called me Aunt Helen.


This is Autry's cousins little boy. He is a sweetheart.


The boys giving me goodbye hugs & kisses. Nephew was really sad I was leaving.


Before we headed home we made one last stop at Red Bluff, Marion County, MS. It's SO beautiful, but I was scared to death of getting too close to the edge because it's a pretty far drop down there.


First Stafford Family photo. We were both really excited. (still are!)


On the way out we drove past this 'swap-like' place. Autry said it wasn't a swamp, but it sure looked like one to me.


Another photo of a bridge on the way home. I really like these bridges!


Back in Missouri: a beautiful Missouri sunset.

Our Missouri trip earlier this year went really well and we had a lot of fun. We didn't get to do a lot of the things we had planned on doing, but we sure had a good time & I am looking forward to our next trip to the south!